
Advanced Triggers allow experienced sellers to have more customization to set up a trigger.
Create a New Trigger:
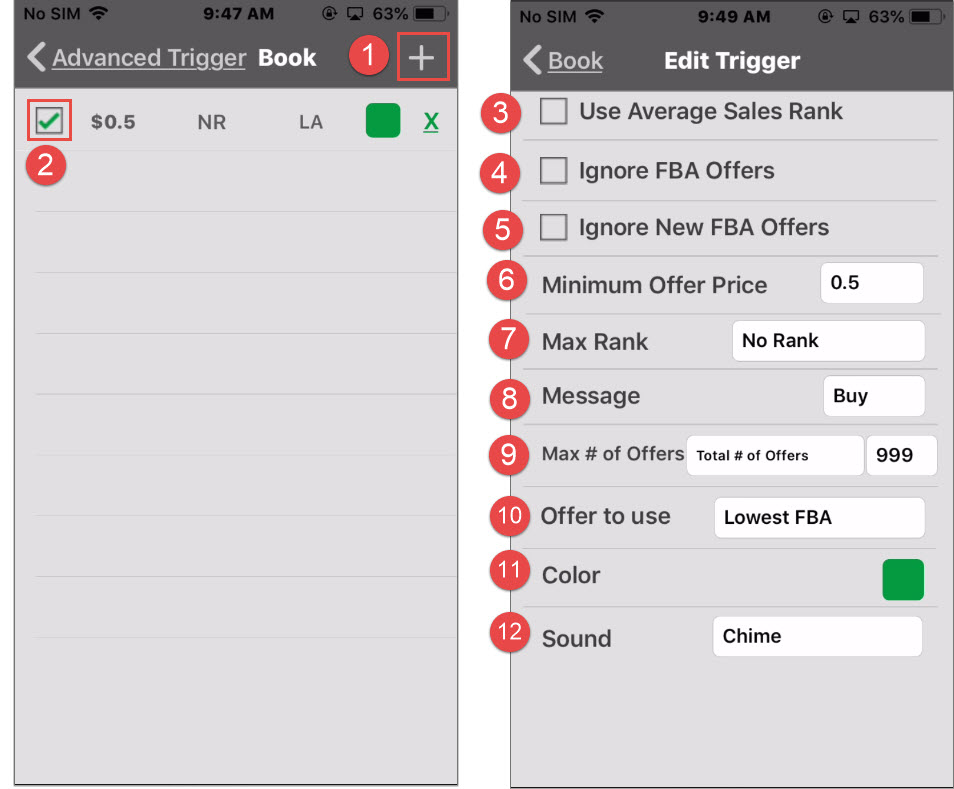
- Tap ‘+’ (1) to add a new trigger
- Check this box (2) to enable the trigger.
- Enable whether to use the item’s Average Sales Rank (3). This is a more accurate measure of popularity as it takes into account the item’s past 6 months of sales history.
- If you check Ignore FBA Offers (4), the app will select the offer price only from Merchant Fulfilled (non-FBA) offers.
- If you check Ignore New FBA Offers (5), the app will select the offer price only from Merchant Fulfilled and Used FBA offers.
- Set the minimum offer price (6) and maximum sales rank (7) of this trigger. In order for this trigger to signal the item as a ‘Buy’, the items’ offer price must be >= this trigger’s minimum price (6) and item’s sales rank must <= this trigger’s maximum sales rank (7).
- Set the message to appear in the decision box if this trigger signals the item as Buy (8).
- The maximum number of offers for this product on Amazon (9). If the number of sellers is greater than this number, the item will not be listed as a ‘Buy’.
- Choose which offer to compare (10) against the minimum offer price (6) of this trigger.
- Set the background color for the Buy text (11), if this trigger signals the item as a Buy.
- Play a sound or vibrate (12), if this trigger signals the item as a Buy.
- The trigger will automatically save when you return to the trigger list screen.
To edit an existing trigger, you just tap it from the triggers list.
How it Works:
- After you scan a barcode, the app will get the offers’ price either from an offline local database or the Internet.
- The app will use the first trigger from the list. Based on this trigger’s settings, the program will select an offer from the offers. If its price is >= Minimum Offer Price (6) and its sales rank is <= Max Sales Rank (7), then this trigger will signal the item as ‘Buy’. The program will display this trigger’s ‘Buy’ message, background color and play its sound.
- Otherwise the app will use the next trigger from the list. The app will repeat this process until a trigger can signal the item as ‘Buy’, or it goes through all the triggers.
- If you enable the Adv + Basic Triggers option in Settings, the app will continue to use Basic Triggers to check. If not enabled, then the program will then signal this item as ‘Reject’.
Feedback
Copyright © 2024 ASellerTool, Inc.
—
Powered by 
Post your comment on this topic.